Friday, December 22, 2023

Talaria Sting R MX4 Licence Plate Holder Mount

 I just finished fabricated a plate mount / holder.

I has a spare piece of 6061 aluminum and so I marked that up, drilled the holes, cut it with my jigsaw, filed some radii on the corners and put a slight bend it it. 

I'll spare you all the details, but here are some pictures. Note the tail light / brake light that I built earlier illuminates it nicely!


I used a silicone plate frame to make the edges of the plate safer and nylon bolts. Total weight of the mount, frame, plate and bolts is 211g or 7.5oz.


Monday, December 18, 2023

Adventure Riding Boots: Sidi Adventure 2 vs Gaerne G.Dakar GTX vs Sidi Crossfire vs Alpinestars SMX-6 v2

First, I want to thank Atomic-Moto at https://www.atomic-moto.com/ for helping me pick my new boots and providing lots of helpful advice. They are great and you really should buy your gear there!

Note that all of the boots described and weighed in this comparison are European size 41. This is approximately a USA size 7.5 to 8.

I'm a lifetime motorcyclist, but I've only been riding off road for over a bit over 10 years. Particularly as an "older" rider, I believe in wearing the best protective gear I can get. So I've been wearing a great pair of Sidi Crossfire boots for many years. These things are awesome:

Sidi Crossfire - size 41 -  4 lbs. 4.8 oz.

But they are HEAVY. They are about 4.3 pounds (1950g). Also they have a metal toe cap that is very slippery in certain circumstances... they can be deadly on tile floors. All that said, they are great protection. 

Now it is important to note heavy boots won't protect you from everything. About 4 years ago I was riding in these Sidi Crossfire boots with EVS Web Pro knee braces when I caught my toe on a ridge on the right side of the trail. My foot was twisted around to the outside badly breaking my fibula: 

I carry a satellite beacon but somehow I managed to ride out of the desert without using it... but it was painful.

So top of the line boots and knee braces won't protect you from everything! But maybe they saved me form worse or different injuries. My point is that while you want very protective gear, no gear is perfect.

At any rate, being older and slower I recently purchased a much lighter ebike and I plan on doing shorter, slower and less aggressive rides. And I have decided to get some lighter gear as well. The Sidi Crossfires feel like anchors to me, the pair is almost 9 pounds! So my goal was to find some lighter but still protective boots.

At the lightweight end of the spectrum, just for reference, I have a pair of Alpinestars SMX-6 v2. Alpinestars call these a "track and street performance boot". 

Alpinestars SMX-6 v2 - size 41 - 1 lbs. 13.4oz.

That is LIGHT, 1.8 pounds (833g). But not nearly enough ankle support and protection for off road use.

So I purchased both the Sidi Adventure 2 and the Gaerne G.Dakar GTX so I could compare them. Note that I have seen some variation in the Gaerne boot's name: Dakar, G. Dakar, Dakar GTX, but they all appear to be the same boot. The Gaerne boot does seem significantly less expensive that the Sidi at this time.

Sidi Adventure 2 - size 41 - 2 lbs. 9.4oz.

Gaerne G.Dakar GTX - size 41 - 2 lbs. 13.8 oz.

So the Sidi Adventure 2 is about 2.6 lbs. (1174g) and the Gaerne G.Dakar is 2.8 lbs (1298g). So the Adventure 2 is about 10% lighter than the G.Dakar.

Note also the Adventure 2 is about 40% lighter than the Crossfire boot! That's about 3.4 pounds for a pair of boots.

The Dakar is about 33% lighter than the Crossfire boot, or about 2.9 pounds lighter for a pair of boots.

Here are some pictures comparing the linings of the boots:

Adventure 2 on the top and Dakar on the bottom.

Note the liner of the Adventure 2 goes all the way to the top and the Dakar ends a bit lower. I thought that might make the Dakar cooler in the Southern California heat, but in my short "try-on" the lightness of the Adventure made it seem like it might actually be cooler? Kind of impossible to judge by a 2 minute test in my living room.

Also note the brown colored areas of the Dakar are actual leather, where the Adventure is some kind of synthetic. I'm sure it's good, but I'd personally prefer the real leather of the Dakar.
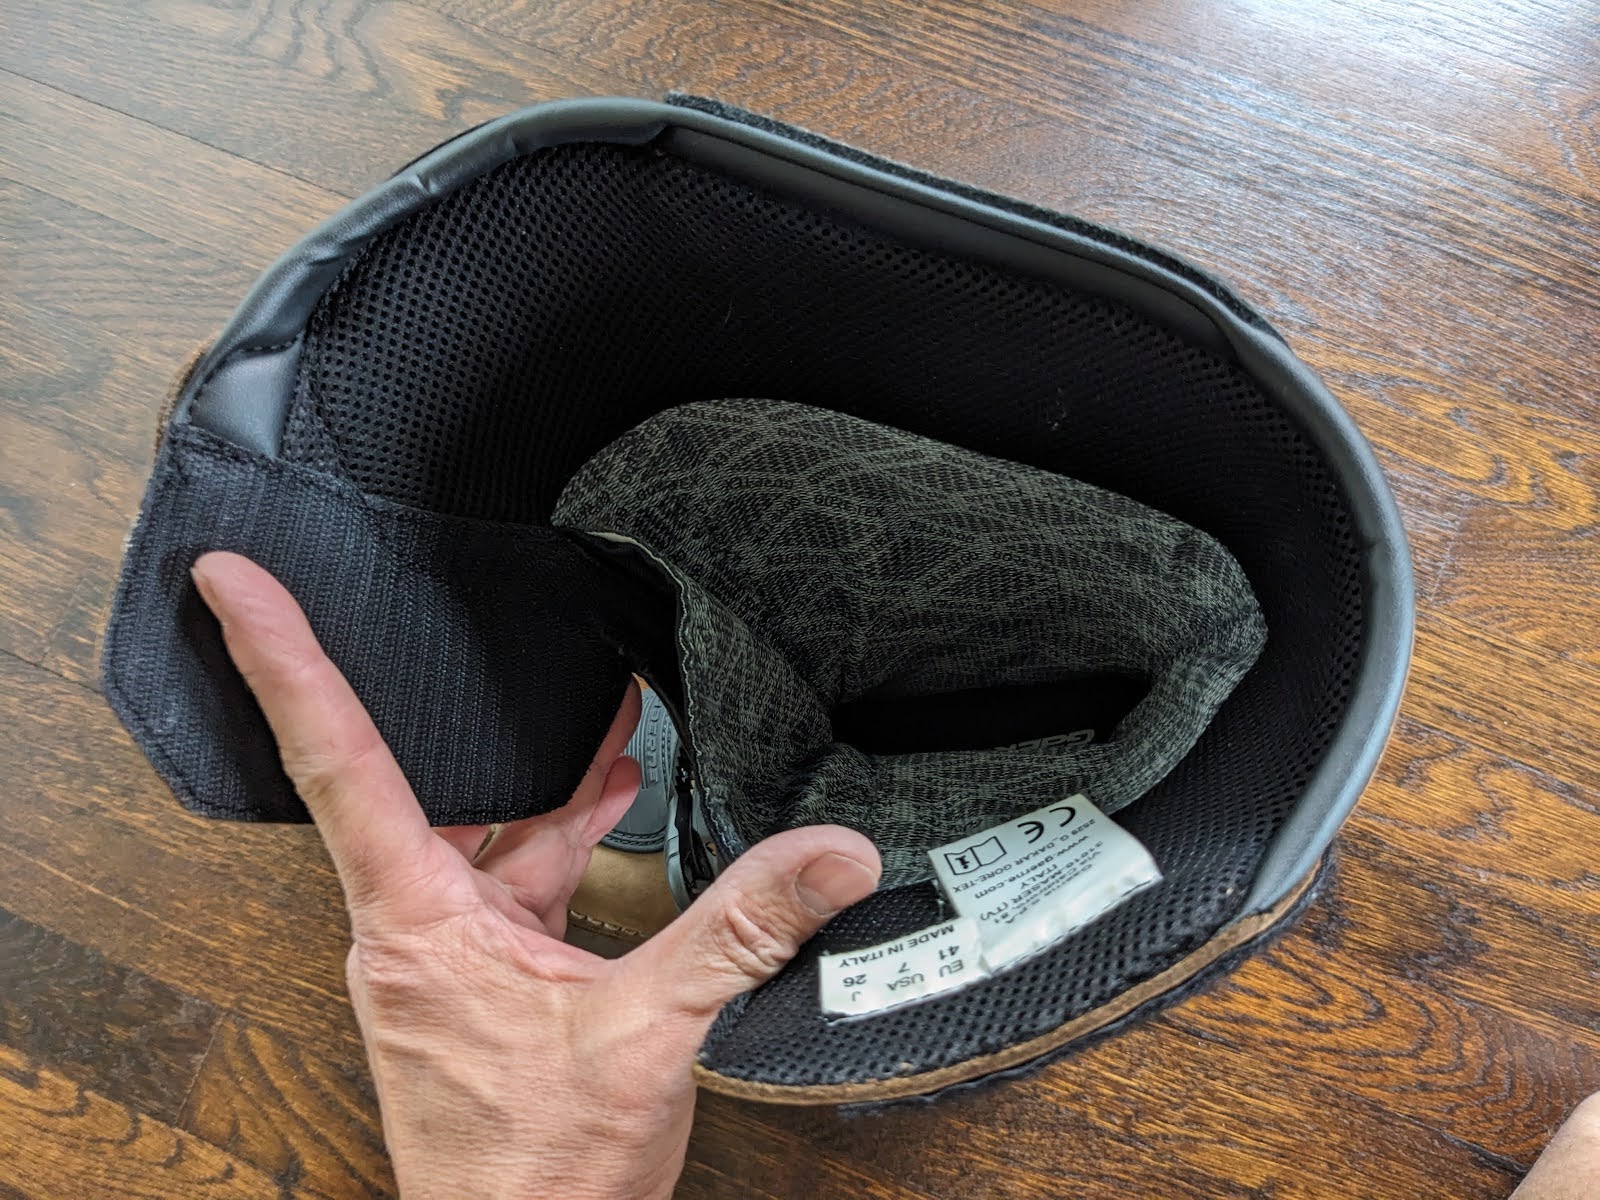
Adventure 2


Dakar

Above are pictures down into the boot. I don't have much comment on these. Both boots are made in Italy.

The ankle of both the Adventure 2 and Dakar felt similar in stiffness to me. The soles were also both stiff, but they ARE flexible, not like the totally inflexible Crossfire. This flexibility will make them less protective than a real motocross boot like the Crossfire.

Note the Dakar has a real stitched-on sole. The Adventure 2 sole has some molding that looks like stitching but is not and appears to be bonded. My understanding is that a cobbler can replace either kind, so this did not matter to me personally.

I did slightly prefer the Adventure2's buckles, but that may just be because I am used to the similar design on the Crossfires. 

I did prefer the plastic under the lower buckles on the sides of the Sidi Adventure 2... it seemed more protective if the side of your foot was smashed by something. The lower buckle on the Gaerne Dakar seems to sit right on the leather and might be a bit more injurious in an impact? On the other hand, I preferred the hinge area on the  inside of the ankle on the Dakar, as it was nice and smooth. The pivot point on the inside of the Adventure 2 bumps out a pit. These two pictures show these differences:

Adventure 2 on the top and Dakar on the bottom.

After trying them both, the Sidi just fit my foot better. It didn't feel appreciably narrower to me, although it definitely was narrower if you examined the sole. But in size 41, the Gaerne was a bit short on my foot, it felt more like a size 40. But I was sure going up to a 42 would be too large. So the Sidi fit me better and was lighter, and that decided it for me; I kept the Sidi Adventure 2. (See below addendum 2)

All, that said, I really liked the Gaerne G.Dakar GTX. If it had fit me better, I would might have kept it instead. I liked the leather construction, the real stitched on sole, and that it was less expensive.

ADDENDUM 1:

Once I picked the Sidi Adventure 2, I wore them a bit more, and immediately noticed a "hot spot" on my ankle right above the ankle bone. The boot was just a bit tight there and pressed against my ankle just above the inside hinge point. Looking at the boot I noticed that the cross section of the boot around the upper buckle (around the upper ankle) was very oval, with the long axis being from the front to the back of the boot. It was almost as if it had been stored a long time with the boot being a bit squished from the side. More likely, the base molding of the plastics in that area was just shaped that way. I could probably just have worn the boots a while and it may have "broken in". But in my experience it can take a long time for plastic boots to adjust to your feet, sometimes they need some help.

I carefully heated the plastic of the boot above and just in front and behind the pivot, and then clamped the boot just a bit to make it a bit rounder. And then I heated the boot a again. Be very careful not to heat the plastic too much, I just do it until it is hot to touch, no more. You don't want to damage the plastic! After cooling overnight, the ankle area was a bit rounder and the fit was perfect... but, it didn't last..

ADDENDUM 2:

The plastic ankle on the Sidi Adventure 2 kept recovering to it's narrow original shape. Also, it didn't seem like there was much padding around the ankle bone. At this point, I had only worn these boots around the living room... and at $450 I became concerned they would always hurt my ankles.  If you remember from above, I did really like the Gaerne Dakar, they were just a bit too short and I feared the next size up might be too big. But it seemed that I should return the Sidi's and try the larger Dakar. So I brought the Sidis back to my local Cycle Gear and I purchased a pair of size 42 Gaerne Dakars from Brian at  Atomic Moto (great company!). This time a received them in my preferred "all black", as I ordered.

Gaerne G.Dakar GTX - size 42 - 2 lbs. 15.1 oz.

I have happily found that the size 42 fits me well! I find them also a bit snug around the ankle bone, but they seem better padded and don't cause me the same pain there. 

Here is some revised weigh data comparing to the new size 42.: So the size 41 Sidi Adventure 2 is about 2.6 lbs. (1174g) and the size 42 Gaerne Dakar is 2.9 lbs (1335g).  

So for the sizes that fit my feet, the Dakar (42) is about 14% heavier than the Adventure 2 (41), about 0.7 pounds for a pair of the boots. Conversely, The Adventure 2 (41) is about 12% lighter than the Dakar (42).

The Dakar is about 32% lighter than the Crossfire boot, or about 2.7 pounds lighter for a pair of boots.

Note also the Adventure 2 is about 40% lighter than the Crossfire boot. That's about 3.4 pounds for a pair of boots.

Having spend a bit more time now with the Gaerne Dakar boots, I do really like them. I like the leather construction and the real welt sole. They do feel a bit softer than the Sidi and maybe provide a bit less protection for rolling your ankle to the side. There is certainly more plastic in the Sidi's construction (which might be a good thing protection-wise?). The Gaerne sole is a bit wider, and feels a bit more stable walking around.

So in the end, I still think these are both good boots. What is important is finding the pair that fits you best!

Sunday, December 17, 2023

Talaria Sting R MX4 LED Brake Light

The stock Talaria Sting R MX4 comes with a tail light that does not function as a brake light. 

If you have some basic electrical skills, it is easy to add one! This post shows how to make a combination running tail lamp and brake light. It illuminates whenever the key is on and gets brighter when you use the brakes. There is a video demo at the bottom of this post.

Now here is an important point: some people disconnect the brake switch connectors at the brake levers. Those are needed for the brake light switch! If you want to disconnect the brake lever switches from the bike's controller so they don't cut the motor when braking, but still want a brake light... see Part 2 at the end of this post.

Before you do any electrical work on the bike, turn off the battery circuit breaker switch and disconnect the battery cable!

I chose this brake light, because the mounting bolts will fit the stock location on the MX4. The bolts are a bit thinner, but they are the same distance apart, 50mm.

https://www.aliexpress.us/item/3256804455921224.html


This is the proper connector to attach to the MX4 wiring harness. It's known as a Furukawa 3 Pin FW-C connector. I suggest buying a bunch of these so you can use one or two to learn how they are assembled. I would get at least 5 pairs (both male and female).

https://www.aliexpress.us/item/3256801837914294.html

You have to remove the whole tail section of the bike to get under the seat. Note how the original light is installed before you remove it.

Cut the new light's wiring to be the same as the original and wire up the connector pins. Be sure to put the red plugs on the wires first! The connectors should be crimped with a proper crimper, (but it's probably possible to find another way with some careful work with some needle nose pliers). I soldered them too. You can see that I used some sheathing to protect the wires.


 You should test the wiring yourself, but here is how mine worked:


Here is the completed brake light and harness:


And here is a picture of the original light next to the new one:

Left: original tail light, Right: new brake light

Be careful when you assemble the light on the bike to not crush the wires. To help protect the wires I added some washers to space the light out a bit from the mounting bracket. I also routed the wire off to the side  and above the mounting bolt as shown.

Installed and zip tied in place.


PART 2: Disconnecting the brake switches from the motor cutoff but still making the brake light work.

If you want to disconnect your brake lever switches from the bike's controller so they don't cut the motor but you still want a brake light, then things get more complicated. You will need a second harness. I'm not going to detail all of this, as it is a more complicated project. But I will show the basics.

Basically you need an "adapter harness" to go between the new brake light and the bike's factory harness and to also connect to the brake lever sensors (switches). Here is a basic schematic:


The brake sensors are not shown, but must be wired in parallel so that either lever triggers the brake light. I found the red 2 pin female version of this connector worked to connect to the brake levers.

https://www.amazon.com/dp/B09KLK766X

You can see how I wired the two brake light sensors in parallel to the adapter harness here:


Here is my completed adapter harness:


 And then you put it all together. There you go!

Demonstration video:

Wednesday, June 28, 2023

SDGE with SDCP CCA


Note that 80% of San Diego County gets their power from SDCP... I bet most don't even know it! https://timesofsandiego.com/business/2023/06/26/sdges-mission-evolves-as-majority-now-buy-power-from-community-choice-aggregators/

Here is a potentially important tidbit about I learned about NEM with San Diego Community Power (SDCP). Others have written about this but I am just figuring it out.

TLDR: If you expect ALL the following to be true:
  1. with solar you will have months where you have excess solar generation and other months that you need some power from the grid
  2. you are on the SDCP CCA
  3. you can handle the budgeting if you owe SDGE a large chunk of money at the end of the year instead of paying it on the months you use more power than you generate.
THEN: As soon as you get PTO, call SDCP and get on the ANNUAL NEM billing plan. 
*Don't wait.*

Detailed explanation follows:

Check now, before your solar installation is complete, if you have San Diego Community Power (SDCP) as your provider of power on the SDGE bill. They tried to force us all into this, so unless you opted out, I think you were pushed into the CCA a couple years ago. I was. Note this is kind of hidden on the SDGE bill, you have to dig around. You don't get a separate bill from SDCP, you have to check the SDGE bill.

If your "Electric energy" is provided by SDGE, you are all set. However if it is provided by SDCP as shown above... When you start solar SDCP sneakily defaults you to a MONTHLY NEM Billing instead of ANNUAL NEM billing.

The claimed rationale for this is that if you owe money in any given month(s), you will pay it that month and will have no chance of a surprise large bill at the end of the year. This is true. It may actually be a big help to people who never spend the time to figure out how the billing works.

However! If your situation is such that you have an excess on some months and a deficit on others, you will probably want the excess credits to roll forward to pay the bill on deficit months. And you use the credits against the debits in a close to 1:1 manner. If you are on MONTHLY billing, you will still get paid a bit for any excess monthly credits at the end of the year, but it is at a very small ratio, not 1:1. So it is much better to use your credits against deficit months instead of saving them to be paid out at the end of the year!

So, ANNUAL billing can be a big advantage for the solar owner! On the other hand, MONTHLY NEM billing can possibly detract from the benefits of solar.

To switch to ANNUAL billing, you really, really want to do this right after they turn on your solar (PTO), BEFORE YOUR FIRST BILL. If you wait, you may be restricted in making other billing changes. Once things are set up, you can only make one billing change per year and you don't want this starting default setting change to count as your once a year change.

Friday, February 17, 2023

Tips for getting a home solar system in California

I recently signed a contract to get solar for our home
and I learned many things during my hunt for the best system. 
Here are my tips! 
(I will update this post as I learn more during the design and installation process.)

Here are some of the first things to consider before contacting any solar companies

  • Is your roof recent and in excellent condition? You don't want to put solar on an old roof.
  • Can you self finance or pay outright? The best and fastest payback is if you have no loan or a low interest loan.
  • You can definitely get financing from the installer, and it's worth looking at, if you can't self finance.
  • Will you stay in the house long enough for the investment in solar to pay off?
  • In my experience, if the system is not financed and is purchased outright, it will payoff in about 4 or 5 years. If it's financed, it might be twice that long.
  • It’s possible that the system adds some value to your home, but I wouldn’t count on that.
  • Besides outright purchase or financing options, the last option is a lease or PPA (power purchase agreement). These are the least attractive... but it is possible they work. They should just be approached very carefully. Note that you don't own the system with these, and that can make for problems, especially if you want to sell your home.
  • Imagine your electrical bill is $200 per month. In that case, every extra $200 you pay for a solar system is an extra month it will take until you break even on the purchase. And a solar system that is $1400 more expensive is an extra year!
After that, there are technical details and contract details. Those are very important, but I think the stuff above needs to be figured out first.

First steps

I'd suggest putting your info in energysage.com and seeing what quotes you get, it does provide a solid starting point. But be aware the stuff responses you get are "proposals" or "quotes" and the next step is getting an actual "contract" from them... and the details on those contracts can really matter. I would narrow down the field from the energysage proposals but I wouldn't select one until considering the actual contracts. And after getting the first energysage proposals, I'd also directly contact 2 or three reputable local companies to compare, as many of the best companies are not available through energysage.

But energysage is a quick and easy start, consider just doing that right away. You will learn a lot from those responses.

After you receive the initial quotes

Request that all the companies re-quote based on the same “size” system. (eg: 8000W or whatever size you decide is best). It is impossible to compare quotes that are different sizes.

Consider whether you need string inverters, power optimizers or microinverters. This choice will likely eliminate some of the proposals.

The quality of the equipment matters somewhat. But really solar is a FINANCIAL choice: how do you get the cheapest electricity? As long as the equipment is reliable and doesn’t perform too much worse as it ages, things are good. The best equipment will degrade less as it ages, but you still don’t want to pay too much for that extra performance.

Price per Watt

The key way to compare proposals/quotes and contracts is by “price per Watt”. You take the total cost of the system (before any tax incentives) and divide by the total size of the system in Watts.

Check typical Cost/Watt for your zip code

https://www.californiadgstats.ca.gov/find_installer/

Note that after putting in your zip code, you can select how many entries to show at a time. You can also do a “Secondary Search” for specific contractors. I prefer to sort the results by “Date” so I can see the most recent pricing.

The pricing does seem to have a giant range, but this may be because of different types of contracts and different system sizes.

Pay attention to panel degradation rate.

One of the big differences between different solar panels is their degradation rate. For instance panel “A” may have a degradation rate of 0.25% per year, meaning that it should still have 92% of its performance after 25 years, and Panel “B” may only have 86% of its performance after the same amount of time.

A slightly cheaper panel may be a worse choice if it degrades faster.

Pay attention to the warranty, especially the labor.

Does the warranty cover labor and will that company be around and available to honor the warranty? For instance, note that microinverters are installed under the solar panels, and they are more likely to fail than the panels. So the panel will need to be removed to replace the microinverter. Make sure the warranty covers degradation too.

That said, how many companies are really around to honor 25 year old warranties? A warranty from a small company that goes out of business isn’t worth much.

Don't only compare proposals or quotes, compare the contracts!

The proposals are almost meaningless, as no one signs them. All the important details are in the contract. For instance, if you want consumption monitoring, or particular racking equipment, make sure it is listed in the actual contract. Remember, no matter what the salesman or the proposal or quote says, they won’t be required to do anything that isn’t listed in the contract.

System resizing after the site visit or measuring

There is a strong chance the system design will change after the solar company comes to do detailed measurements of your roof. This typically happens after the contract has been signed. So what happens if the system needs to be made smaller or larger by a couple panels? Does the contract specify how the system is repriced? I have not yet seen this situation described in any contracts. However, I would suggest you ask the company how this happens before you sign the initial contract. I would want an answer like; “If the system is only changing by the number of panels, we reprice the system based on the same price per Watt as the original system.” And be ready to change vendors if a change like this is needed and the vendor does not keep to the same price per Watt.

Pay attention to roof and solar system maintenance requirements.

Some vendor’s contracts specify that you MUST use them to do repairs. For instance, you may own the system, but if you need some roof repairs in 15 years they may require that you use them to do the repairs to maintain the warranty. Some vendors may just require that you use them for anything that requires touching the panels.

Here is an example of a bad clause hidden in a contract that requires you to use that company for future work at whatever they wish to charge you: …”IF THE CLIENT CHOOSES ANOTHER ROOFING CONTRACTOR THE CLIENT WILL INCUR COSTS ASSOCIATED WITH THE REMOVAL AND REINSTALL AND WILL SCHEDULE A SOLAR SYSTEM REMOVAL AND RE­INSTALLATION WITH <company name>.”

Pay attention to the payment schedule.

In California, the contractor is forbidden by law from accepting payments (besides the max $1000 deposit) that are for work that is not yet completed or materials that have not been delivered to the customer. They may not ask you to pay for panels that are not on your property. For instance, a plan that requires payment of 90% of the total “prior to the start of construction” is clearly in violation of the California law.

Note this even applies to financed installations!

The California law:
“Except for a downpayment, the contractor shall neither request nor accept payment that exceeds the value of the work performed or material delivered. The prohibition prescribed by this paragraph extends to advance payment in whole or in part from any lender or financier for the performance or sale of home improvement goods or services.”
https://leginfo.legislature.ca.gov/faces/codes_displaySection.xhtml?sectionNum=7159.5.&lawCode=BPC

These are examples from actual contracts I was offered:

Example “illegal” payment schedule:
  1. Down payment: $1000
  2. Due at permits: 30% (illegal if getting to this stage did not cost this much)
  3. Due prior to start of construction: 60% (clearly illegal!)
  4. Due at building inspection: remainder (final payment should be after Permission to Operate)

Example “better” payment schedule:
  1. Down payment: $500
  2. Completion of Design and Engineering: 30% (illegal if getting to this stage did not cost this much)
  3. Delivery of Materials: 50%
  4. After city final inspection is approved: Remainder (approx 20% - final payment should be after Permission to Operate)

Example “good” payment schedule:
  1. Down payment: $1000
  2. Deliver of Materials to customer: 70%
  3. Approval to Operate from <power company name>: 30%

Pay attention to performance clauses.

What happens if you need to delay the installation or even cancel? Some contracts require you to pay all the companies profit even if they never install the system! Here is a real example of a ugly cancellation clause: “Customer may terminate its performance of this Agreement for convenience, provided that Customer immediately pays <company name> for all costs incurred through the date of termination, measured as a percentage of the Work's completion, plus any demobilization costs and a fee in the amount of 20% of the Agreement Price for <company name>’s lost overhead and profit.”

Consumption Monitoring

(This discussion is for Enphase brand systems, I’m not sure if it applies to others.) Typically the equipment that comes with your solar panels will allow you to monitor your solar panel’s production or output. However, you won’t be able to tell whether you are still using power from your utility (or sending power to them) until you get your bill at the end of the month. If you want to monitor, in real time, whether you are using power from the utility you will need “consumption monitoring”. With Enphase, consumption monitoring requires the addition of two current transformers (CTs) to your electrical service panel. These CTs are relatively inexpensive (about $52), but may not easily fit your service panel. Some solar companies may install these for free if they fit, and others may charge for the installation. If you want this feature, it is worth discussing the cost before signing your contract.
 

Liens

Most solar installers get the equipment (solar panels, inverters, etc.) from a distributor. That distributor drop ships the equipment to your home on the morning of the installation. You will likely receive a "Preliminary Lien Notice" from the distributor. What this means, is that if the installer doesn't pay the the distributor, they will demand payment from you and will put a lien on your house until you do so. This protects the distributor, no matter what, and can really hurt the homeowner! The only way to avoid this is for the homeowner to pay the distributor directly with a separate check. This provides proof that you have paid the distributor. I suggesting making sure this is explicitly allowed in the payment schedule in the contract. More detail here.
Also, make sure the contract specifies that you will receive an "Unconditional Waiver and Release" form from your contractor when you provide the final payment as a cashiers check.  Do not make your final payment without obtaining this release from your contractor.